ASP.NET Core Database First With Razor Pages
2022-10-29
筆記 ASP.NET Core Razor Pages 專案如何使用 Database First 的方式進行開發。
說明
Nuget Packages
首先由 Nuget 進行下列的相依元件安裝,Proxies 不一定需要安裝,如果需要使用 UseLazyLoadingProxies 則必須安裝。
Install-PackageMicrosoft.EntityFrameworkCore.Design -Version 6.0.10
Install-PackageMicrosoft.EntityFrameworkCore.SqlServer -Version 6.0.10
Install-PackageMicrosoft.EntityFrameworkCore.Tools -Version 6.0.10
Install-PackageMicrosoft.EntityFrameworkCore.Proxies -Version 6.0.10
建立 DBContext
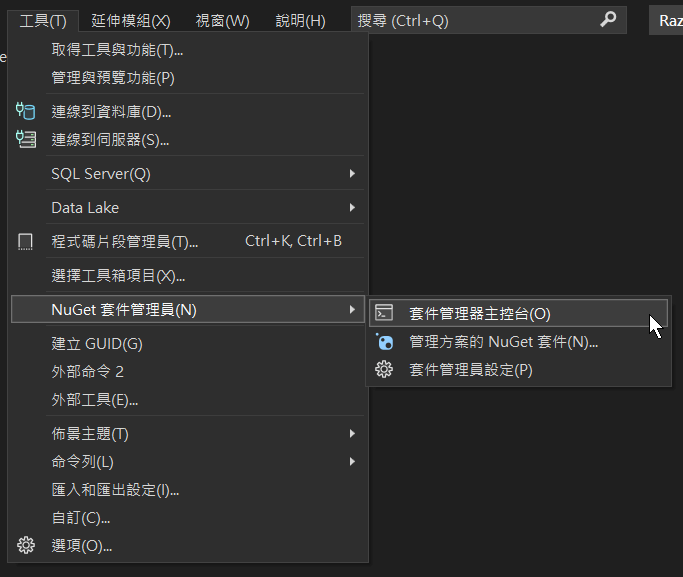
使用 Nuget Package Manager Console 建立 DBContext 以及自動由 DB Table 產生 Model。
Scaffold-DbContext
  -Connection "Server=.;Database=Pokemon;Trusted_Connection=True;"
  Microsoft.EntityFrameworkCore.SqlServer
  -OutputDir Models -context PokemonContext
完成上述指令後,會自動產生下列的兩個類別:
/Models/Pokemon.cs
public partial class Pokemon
{
    public int Pno { get; set; }
    public string Name { get; set; } = null!;
    public string NameCt { get; set; } = null!;
    public byte Hp { get; set; }
    public byte Atk { get; set; }
    public byte Def { get; set; }
    public byte SpAtk { get; set; }
    public byte SpDef { get; set; }
    public byte Speed { get; set; }
    public string Type1 { get; set; } = null!;
    public string? Type2 { get; set; }
}
PokemonContext.cs
public partial class PokemonContext : DbContext
{
    public PokemonContext(DbContextOptions<PokemonContext> options)
        : base(options)
    {
    }

    public virtual DbSet<Pokemon> Pokemons { get; set; } = null!;

    protected override void OnConfiguring(DbContextOptionsBuilder optionsBuilder)
    {
        if (!optionsBuilder.IsConfigured)
        {
            optionsBuilder.UseSqlServer("Server=.;Database=Pokemon;Trusted_Connection=True;");
        }
    }

    protected override void OnModelCreating(ModelBuilder modelBuilder)
    {
        modelBuilder.Entity<Pokemon>(entity =>
        {
            entity.HasKey(e => e.Pno);

            entity.Property(e => e.Pno).ValueGeneratedNever();

            entity.Property(e => e.Hp).HasColumnName("HP");

            entity.Property(e => e.Name)
                .HasMaxLength(50)
                .IsUnicode(false);

            entity.Property(e => e.NameCt)
                .HasMaxLength(50)
                .HasColumnName("Name_CT");

            entity.Property(e => e.Type1)
                .HasMaxLength(10)
                .IsUnicode(false)
                .IsFixedLength();

            entity.Property(e => e.Type2)
                .HasMaxLength(10)
                .IsUnicode(false)
                .IsFixedLength();
        });

        OnModelCreatingPartial(modelBuilder);
    }

    partial void OnModelCreatingPartial(ModelBuilder modelBuilder);
}
在自動產生的 PokemonContext.cs 當中,我們需要主動移除沒有參數的建構子,否則系統會發生錯誤。

依賴注入
首先需要在 Program.cs 當中加入 AddDbContextPool,會需要提供 Context 類別以及,設定相關的 option。
原本產生的連線字串是直接接字串方式提供,調整為儲存在 appsettings.json 的方式取用。
接著再用依賴注入的方式,採用 AddScoped 以 Respository Pattern 的方式將介面以及實作的類別提供,完成注入。
Program.cs
using Microsoft.EntityFrameworkCore;

builder.Services.AddDbContextPool<PokemonContext>(
        options => options
            .UseLazyLoadingProxies()
            .UseSqlServer(builder.Configuration.GetConnectionString("DefaultConnection")));

builder.Services.AddScoped<IPokemonRepository, PokemonSqlServerRepository>();

var app = builder.Build();
連線字串集中 appsettings
appsettings.json
{
  "Logging": {
    "LogLevel": {
      "Default": "Information",
      "Microsoft.AspNetCore": "Warning"
    }
  },
  "AllowedHosts": "*",
  "ConnectionStrings": {
    "DefaultConnection": "Server=.;Database=Pokemon;Trusted_Connection=True;"
  }
}
集中後,只要在 Program.cs 使用下列的語法就可以取得連線字串的內容:
builder.Configuration.GetConnectionString("DefaultConnection")預設由 Scaffold 所產生出的 Context,會主動檢查連線字串,在未設定時使用預設:
PokemonContext.cs
protected override void OnConfiguring(DbContextOptionsBuilder optionsBuilder)
{
    if (!optionsBuilder.IsConfigured)
    {
        optionsBuilder.UseSqlServer("Server=.;Database=Pokemon;Trusted_Connection=True;");
    }
}
因為已經集中在 appsettings.json 故可以取消這個設定,或者設定為其他備援的資料庫連線字串 🙂
依賴注入所需的介面與實作類別
因為要採用依賴注入的方式,並且結合 Respository Pattern 來設計,因此需要先定義介面以及實作類別。
IPokemonRepository.cs
namespace PokemonCenter.Models
{
	public interface IPokemonRepository
	{
        IEnumerable<Pokemon> GetPokemons();
        Pokemon GetPokemon(int pid);
    }
}
PokemonSqlServerRepository.cs
namespace PokemonCenter.Models
{
	public class PokemonSqlServerRepository : IPokemonRepository
	{
    private readonly PokemonContext _context;

    public PokemonSqlServerRepository(PokemonContext context)
    {
        _context = context;
    }
    public Pokemon GetPokemon(int pid)
		{
			return _context.Pokemons.FirstOrDefault(p => p.Pno == pid) ?? new Pokemon();
		}

		public IEnumerable<Pokemon> GetPokemons()
		{
			return _context.Pokemons;
		}
	}
}
Razoe Page
public class PokedexModel : PageModel
{

    private IPokemonRepository PokemonRepo { get;}
    public IEnumerable<Pokemon> Pokemons { get; set; } = null!;
    public PokedexModel(IPokemonRepository pokemonRepo)
    {
        PokemonRepo = pokemonRepo;
    }
    public void OnGet()
    {
        Pokemons = PokemonRepo.GetPokemons().ToList();
    }
}
@page
@model PokemonCenter.Pages.PokedexModel
<table class="table">
<thead>
<tr>
<th>Name</th>
<th>名稱</th>
<th>屬性</th>
<th></th>
</tr>
</thead>
<tbody>
@foreach (var pokemon in Model.Pokemons)
{
<tr class="align-middle">
<td><a asp-page="/Pokemon" asp-route-Pid="@pokemon.Pno">@pokemon.Name</a></td>
<td>@pokemon.NameCt</td>
<td>@pokemon.Type1 @(pokemon.Type2 == null ? "" : $" / {pokemon.Type2}")</td>
<td>
<img src="~/imgs/@(pokemon.Pno).png" alt="" />
</td>
</tr>
}
</tbody>
</table>