超簡單學習 Vue.js 系列 | Vue Ramen (Form)
2022-01-02
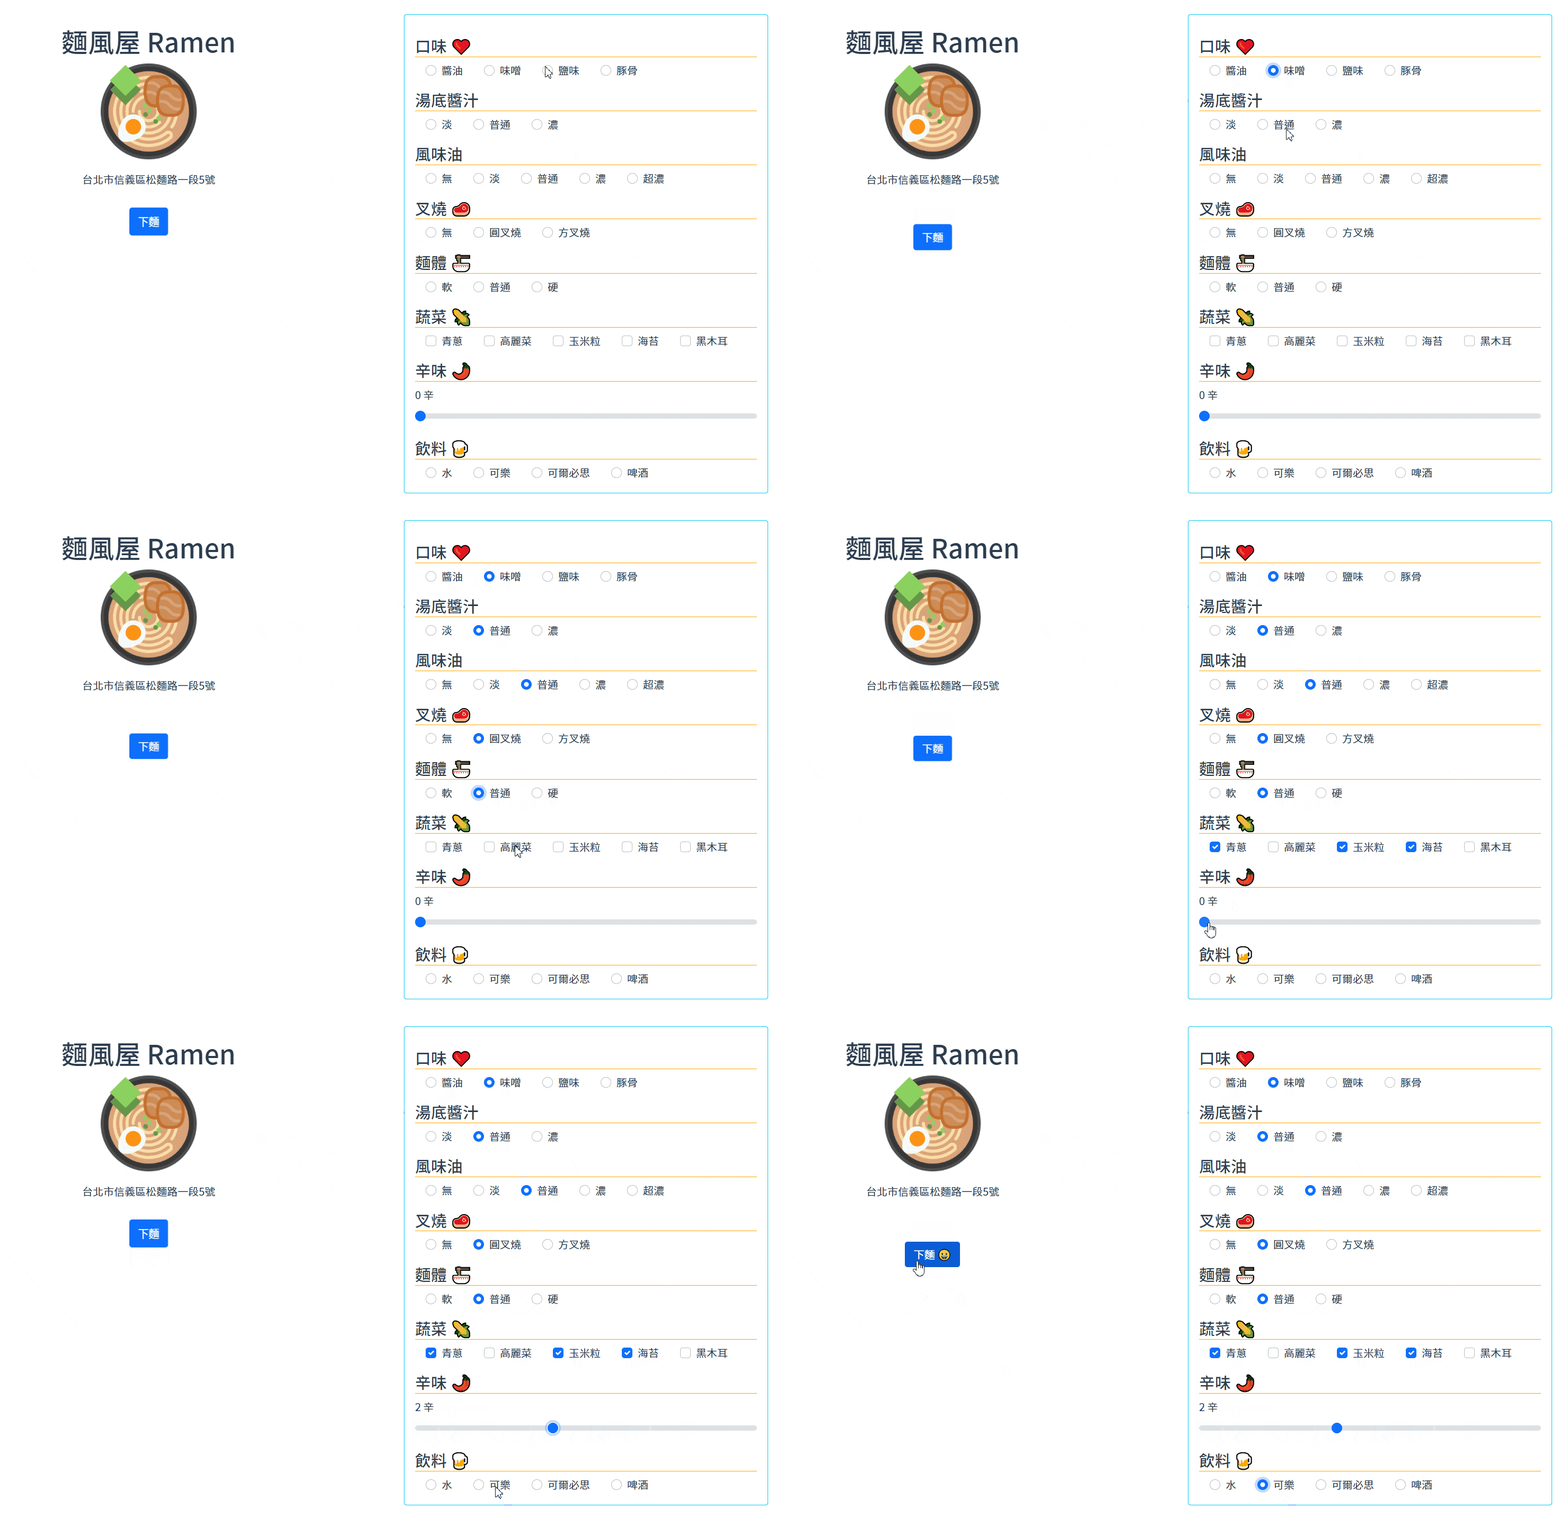
Vue.js 簡單的示範專案,本次要說明的是 Vue 與表單設計 (form design) 的結合,以客製化拉麵為範例,使用 Vue CLI 實作將所學習的知識以及實作需要的功能,藉此將知識實際結合,記得牢、想得到、用得出來。本次專案結合使用 Boostrap.css 以及 Animate.css。

客製化拉麵 Vue Ramen

| 技術關鍵字 | 說明 |
|---|---|
| Animate.css | 簡易讓元素產生動畫效果,讓呈現更為活潑 |
| Google Font API | 豐富可以使用的字體,必須要客戶端另外安裝,以載入的方式使用 |
專案建立
npm install bootstrap
npm install animate.css
App.vue
<div class="container">
  <div class="row">
    <div class="col-lg-7 my-3 p-3">
      <div class="text-center">
        <h1>麵風屋 Ramen</h1>
        <img alt="Vue logo" src="./assets/ramen.png" id="ramen-logo">
        <p class="mt-3 align-self-end">台北市信義區松麵路一段5號</p>

        <div class="btn btn-primary mt-5
          animate__bounce animate__infinite"
          :class="{
            animate__animated: smile !== '😀'
          }"
          @mouseover="smile = '😀'"
          @mouseleave="smile = ''" >下麵 {{ smile }}</div>
      </div>
    </div>
    <div class="col-lg-5 mx-auto my-3 p-3 rounded border border-info">
      <Ramen/>
    </div>
  </div>
</div>
在 App.vue Template 上主要用於將左右切割為 7 : 5 的比例,左側為封面 Logo 以及確認按鈕,右側則為可以供客製拉麵內容的表單,表單的部分另外以 Vue Child Component 來實作。
在效果上,利用 Animates CSS 來讓確認按鈕跳動,當游標停留則停止跳動與改變顯示內容 (增加一個 😀),結合了 Vue Dynamic CSS 以及 V-On 的指令來達到此效果。
@import'~bootstrap/dist/css/bootstrap.css';
@import '~animate.css/animate.css';
@import url('https://fonts.googleapis.com/css2?family=Noto+Sans+TC:wght@100;300;400;500;700;900&display=swap');

#ramen-logo{
  width: 150px;
}

#app {
  font-family: 'Noto Sans TC', sans-serif;
  ...
}
在 App.vue Style 引用 bootstrap, animate.css 以及用 CDN 的方式使用 Google Font API。
Ramen.vue
export default {
  data() {
      return {
        ramenStyle : ['醬油', '味噌', '鹽味', '豚骨'],
        sauces: ['淡', '普通', '濃'],
        oils: ['無', '淡', '普通', '濃', '超濃'],
        meats: ['無', '圓叉燒', '方叉燒'],
        vegetables: ['青蔥', '高麗菜', '玉米粒', '海苔', '黑木耳'],
        noodles: ['軟', '普通', '硬'],
        additionals: ['半熟蛋', '雙倍叉燒'],
        spicy: 0,
        drinks: ['水', '可樂', '可爾必思', '啤酒']
      }
  },
  computed: {
      howSpicy: function(){
        return this.spicy >=3 ? "這真的很辣" : ""
      }
  }
};
Script 的部分,包含 Data 以及 Computed,其中 Data 用於渲染 Form 的 Radio 以及 Checkbox 縮減重複的 Code,Computed 則用於增加表單活潑的元素,在特定情境下顯示訊息。目前表單尚尚未有完整的 Data 雙向綁定用於送給後端的設計,僅作為表面的呈現。
<h2>口味 ❤️</h2>
<template v-for="style in ramenStyle" :key="style">
    <div class="form-check d-inline-block mx-3">
        <input class="form-check-input" type="radio"
            name="ramenStyle" :id="style"
        />
        <label class="form-check-label" :for="style">
            {{ style }}
        </label>
    </div>
</template>

<h2>湯底醬汁</h2>
<template v-for="sauce in sauces" :key="sauce">
    <div class="form-check d-inline-block mx-3">
        <input class="form-check-input" type="radio"
            name="sauces" :id="'sauce_' + sauce"
        />
        <label class="form-check-label" :for="'sauce_' + sauce">
            {{ sauce }}
        </label>
    </div>
</template>
Radio 的使用方式,需要注意的是在 id 以及 label for 的搭配,如果有重複值不同的 input 項目會互相干擾,因此必須另外用字串的方式做差異化。例如 suace 與 oil 都有淡、普通、濃,因此在 id 與 for 上,分別以 "suace_淡"、"oil_淡" 的方式區別,就不會影響了。
<h2>蔬菜 🌽</h2>
<template v-for="veg in vegetables" :key="veg">
    <div class="form-check d-inline-block mx-3">
        <input class="form-check-input" type="checkbox"
            name="vegetables" :id="'veg_' + veg"
        />
        <label class="form-check-label" :for="'veg_' + veg">
            {{ veg }}
        </label>
    </div>
</template>
Checkbox 的使用與 Radio 幾乎無異,只差別在 input 的 type 要使用 checkbox。
<h2>辛味 🌶️</h2>
<div>
    <label for="customRange3" class="form-label">{{ spicy }} 辛 {{ howSpicy }}</label>
    <input type="range" class="form-range" v-model="spicy"
    min="0" max="5" step="1" id="customRange3">
</div>
Bootstrap 5 的 Input Range Type 呈現相當美觀,這邊搭配 v-model 並結合 Computed 的方式,如果辛辣程度大於等於 3 就顯示警告訊息。
GitHub
來去 GitHub 專案一探 Source Code 究竟吧 😉