ASP.NET Core WebAPI With JWT
2024-07-01
筆記如何在 ASP.NET Core WebAPI 專案使用 JWT 驗證。
說明
首先安裝 Nuget Package Microsoft.AspNetCore.Authentication.JwtBearer。
<ItemGroup>
  <PackageReference Include="Microsoft.AspNetCore.Authentication.JwtBearer" Version="8.0.6" />
</ItemGroup>
接著設定 appsettings.json 加入 JWT 的 Key。
{
  "Logging": {
    "LogLevel": {
      "Default": "Information",
      "Microsoft.AspNetCore": "Warning"
    }
  },
  "Jwt": {
    "Key": "Your_Very_Strong_Secret_Key_That_Is_At_Least_32_Characters_Long"
  },
  "AllowedHosts": "*"
}
AuthController.cs
接著設定登入用途以及提供 JWT Token 的 Controller,這個 Controller 會驗證帳號與密碼,並回傳 JWT Token,基於示範,帳號與密碼是固定的,實際應用中應該要透過資料庫或其他方式驗證 😲
using Microsoft.IdentityModel.Tokens;
using System.IdentityModel.Tokens.Jwt;
using System.Security.Claims;

[ApiController]
[Route("[controller]")]
public class AuthController : ControllerBase
{
    private readonly IConfiguration _configuration;

    public AuthController(IConfiguration configuration)
    {
        _configuration = configuration;
    }

    [HttpPost("login")]
    public IActionResult Login([FromBody] LoginModel login)
    {
        // Validate the user credentials (this is just a basic example)
        if (login.Username != "test" || login.Password != "password")
            return Unauthorized();

        var tokenHandler = new JwtSecurityTokenHandler();
        var key = Encoding.ASCII.GetBytes(_configuration["Jwt:Key"]);
        var tokenDescriptor = new SecurityTokenDescriptor
        {
            Subject = new ClaimsIdentity(new Claim[]
            {
                new Claim(ClaimTypes.Name, login.Username)
            }),
            Expires = DateTime.UtcNow.AddDays(7),
            SigningCredentials = new SigningCredentials(new SymmetricSecurityKey(key), SecurityAlgorithms.HmacSha256Signature)
        };
        var token = tokenHandler.CreateToken(tokenDescriptor);
        var tokenString = tokenHandler.WriteToken(token);

        return Ok(new { Token = tokenString });
    }
}

public class LoginModel
{
    public string Username { get; set; }
    public string Password { get; set; }
}
Program.cs
將驗證服務加入到 WebAPI 中。
using Microsoft.AspNetCore.Authentication.JwtBearer;
using Microsoft.IdentityModel.Tokens;
using System.Text;

var builder = WebApplication.CreateBuilder(args);

// Add services to the container
var key = Encoding.ASCII.GetBytes(builder.Configuration["Jwt:Key"]);

builder.Services.AddAuthentication(options =>
    {
        options.DefaultAuthenticateScheme = JwtBearerDefaults.AuthenticationScheme;
        options.DefaultChallengeScheme = JwtBearerDefaults.AuthenticationScheme;
    })
    .AddJwtBearer(options =>
    {
        options.RequireHttpsMetadata = false;
        options.SaveToken = true;
        options.TokenValidationParameters = new TokenValidationParameters
        {
            ValidateIssuerSigningKey = true,
            IssuerSigningKey = new SymmetricSecurityKey(key),
            ValidateIssuer = false,
            ValidateAudience = false
        };
    });

builder.Services.AddAuthorization();
builder.Services.AddControllers();

var app = builder.Build();

// Configure the HTTP request pipeline
app.UseHttpsRedirection();

app.UseRouting();

app.UseAuthentication();
app.UseAuthorization();

app.MapControllers();

app.Run();
Application
實際的應用,透過 [Authorize] 屬性來限制存取。
[ApiController]
[Route("[controller]")]
[Authorize]
public class WeatherForecastController : ControllerBase
{
    // GET /weatherforecast
    [HttpGet]
    public IEnumerable<WeatherForecast> Get()
    {
        var rng = new Random();
        return Enumerable.Range(1, 5).Select(index => new WeatherForecast
        {
            Date = DateTime.Now.AddDays(index),
            TemperatureC = rng.Next(-20, 55)
        })
        .ToArray();
    }
}
Test with .http file
POST https://localhost:7130/Auth/Login
Content-Type: application/json

{
    "Username": "test",
    "Password": "password"
}
{
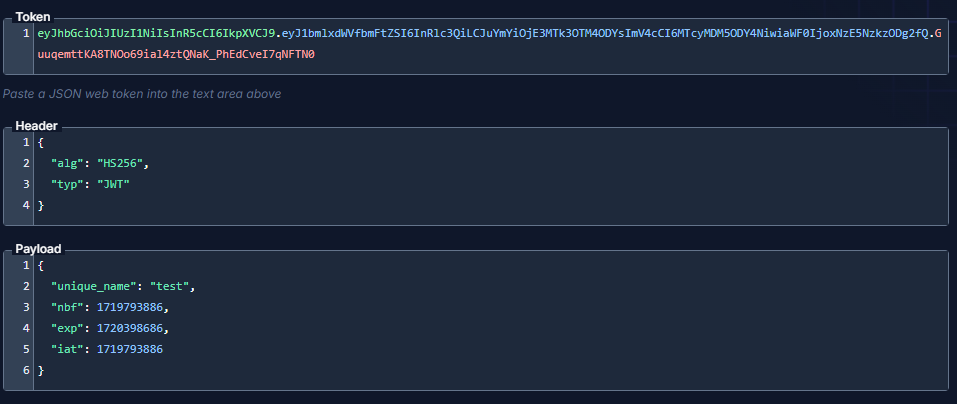
  "token": "eyJhbGciOiJIUzI1NiIsInR5cCI6IkpXVCJ9.eyJ1bmlxdWVfbmFtZSI6InRlc3QiLCJuYmYiOjE3MTk3OTM4ODYsImV4cCI6MTcyMDM5ODY4NiwiaWF0IjoxNzE5NzkzODg2fQ.GuuqemttKA8TNOo69ial4ztQNaK_PhEdCveI7qNFTN0"
}
取得的 Token 可以透過 Dev Tools 來 Decode。

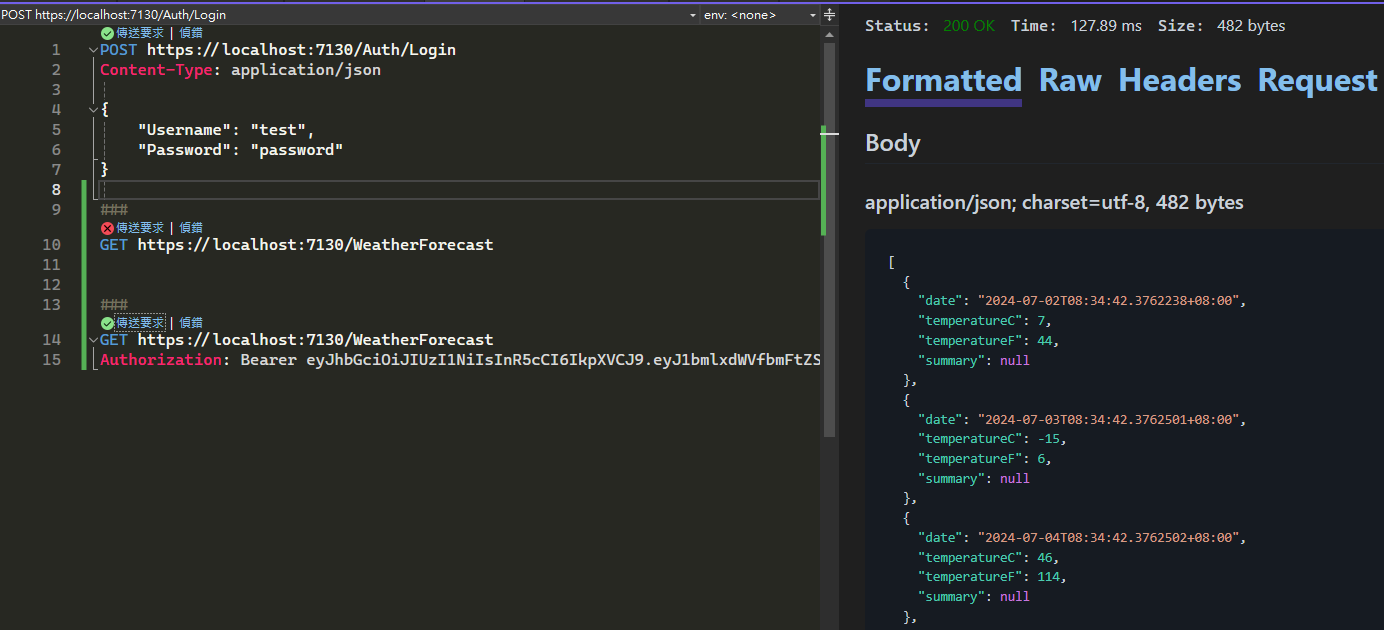
接著實際進行資源存取,如果沒有輸入 Token 則會回傳 401,如果有輸入正確的 Token 則會回傳資源。
GET https://localhost:7130/WeatherForecast

###
GET https://localhost:7130/WeatherForecast
Authorization: Bearer eyJhbGciOiJIUzI1NiIsInR5cCI6IkpXVCJ9.eyJ1bmlxdWVfbmFtZSI6InRlc3QiLCJuYmYiOjE3MTk3OTI2NTAsImV4cCI6MTcyMDM5NzQ1MCwiaWF0IjoxNzE5NzkyNjUwfQ.Tu2N2yPcopFJLWvOcXvM8IRkRaDQcerXxe4fwQz-yuw